


This is one of the comprehensive and most pre-requisite topics on the path of learning AWS. If you refer to the documentation, it is whooping ~1200 pages! But do we need to know all? Well depends:
Are you going to be an AWS administrator who is going to manage company accounts, organization policies, etc. -then yes!
But for developers or solution architects who want to start building -only a subset of this is required.
The purpose of this series is to get started and get certified. We will start with the most basic concepts which will be sufficient for getting started and then in the next part, we will move on to more advanced concepts which will be helpful from point of view of certification.
What does IAM mean? IAM stands for Identity and Access Management :
Identity -who is trying to access. A user via console/CLI, or a program?
Access Management -well, managing which Identities(user/program) can access what?
Let’s not go into jargon -start analyzing, there are resources on amazon, e.g. DynamoDB, S3, Athena, SQS, etc. These all are shared and multiple users will be accessing it -but then how to restrict access, isolate usage of each user, and bill these users separately? These are the “resources” that need to be protected. Users or programs will have a different levels of access and usage:
Read-only
Read and write
Throughput requirements will vary for many users
Quotas will change for each user
So we have resources that need to be accessed in a restricted manner and in different ways -and we have users and programs who will be accessing these resources. How do we manage which users/programs have what permission on these resources? Policy or simply put it as a set of rules like:
Policy1
Allow read-only access to S3
Allow read-only access to DynamoDB
Policy2
Allow read and write access to a particular bucket in S3
Allow read and write access to all tables in Dynamo DB
Allow deletion on S3
By default, everything is disallowed, so typically permissions need to be granted as what is allowed. What’s this now -permissions? The policy attached to a user or program defines what permission a user has on the resources. For example,
Policy1 above can be attached to regular users in an organization
Policy2 can be attached to admin users
So now consider this, if there are 10k users in an organization -are we going to create 10k Policies? Nope, here comes the group. We will group the users as per their role, like regular employees, sales, admin, etc, and then we will create a policy for each group.
In nutshell, AWS IAM tries to answer:
- WHO → CAN ACCESS → WHAT?

Resource, user, and group are pretty straightforward, the crux of IAM is policies, how we define them, and then how we associate them with users, applications, or groups. Let’s dive a bit deeper into policies:
There are many more elaborate concepts but then I will not cover them here, I will have a separate write-up for that. Let’s do a quick example to understand what we have learned so far
Sign up for AWS, if there is no existing account.
Click on "create a new AWS account" if a first-time user or log in with your account if you already have signed up. Creating a new account is self-explanatory, it will need personal details, and card details so no point in showing it here. Everyone gets a free tier for 1 year, which will be sufficient for most of our experimentations. Also, AWS has quick labs which can be used to play around without paying any money.
Refer to video at end for more detailed steps and precise navigation
Log in to the AWS console
Select IAM from the services
Go to the "users" tab on the left side navigation panel
Click on Add users and provide user name
Notice the "Aws credential type" section, there are two ways to access AWS services "Access key - Programmatic access" and "Password - AWS Management Console access"
select "Programmatic access" as we intend to use this key to programmatically access the resources. The second option allows user to login in to the console -which we do not want at this stage.
For getting started easily, we will Attach policies directly. Click on tab "Attach existing policies directly". These are policies provided by AWS for most common permissions like read only for certail resources, complete access on resources etc. -we can select one of these. In future, we can also edit and further extend it. Start typing "AmazonS3" in "Filter policies" and all predefined policies related to S3 will appear. Let's select "AmazonS3ReadOnlyAccess".
Once a managed policy is attached, we are ready to create the user. Skip the tags for now.
After user is successfully created, it will navigate to screen having option to download creadentials for programmatic access of AWS resources in the boundary of permissions provided by policies. There are two parts
access key and secret key
Access key is visible by default but secret key is not. The keys should be downloaded and stored safely. Once we navigate away from the screen, there is no way to retrieve the secret key (Access key will always be visible).
A new Access key and secret key can always be generated
But if we have thousands of users -we cannot keep attaching policy to each and every user. Here comes the concept of groups. We create groups and add users to the group. Attach policy to the group instead of attaching to individual user. Changing the policy at the group level will effectively change the policy for all of the users
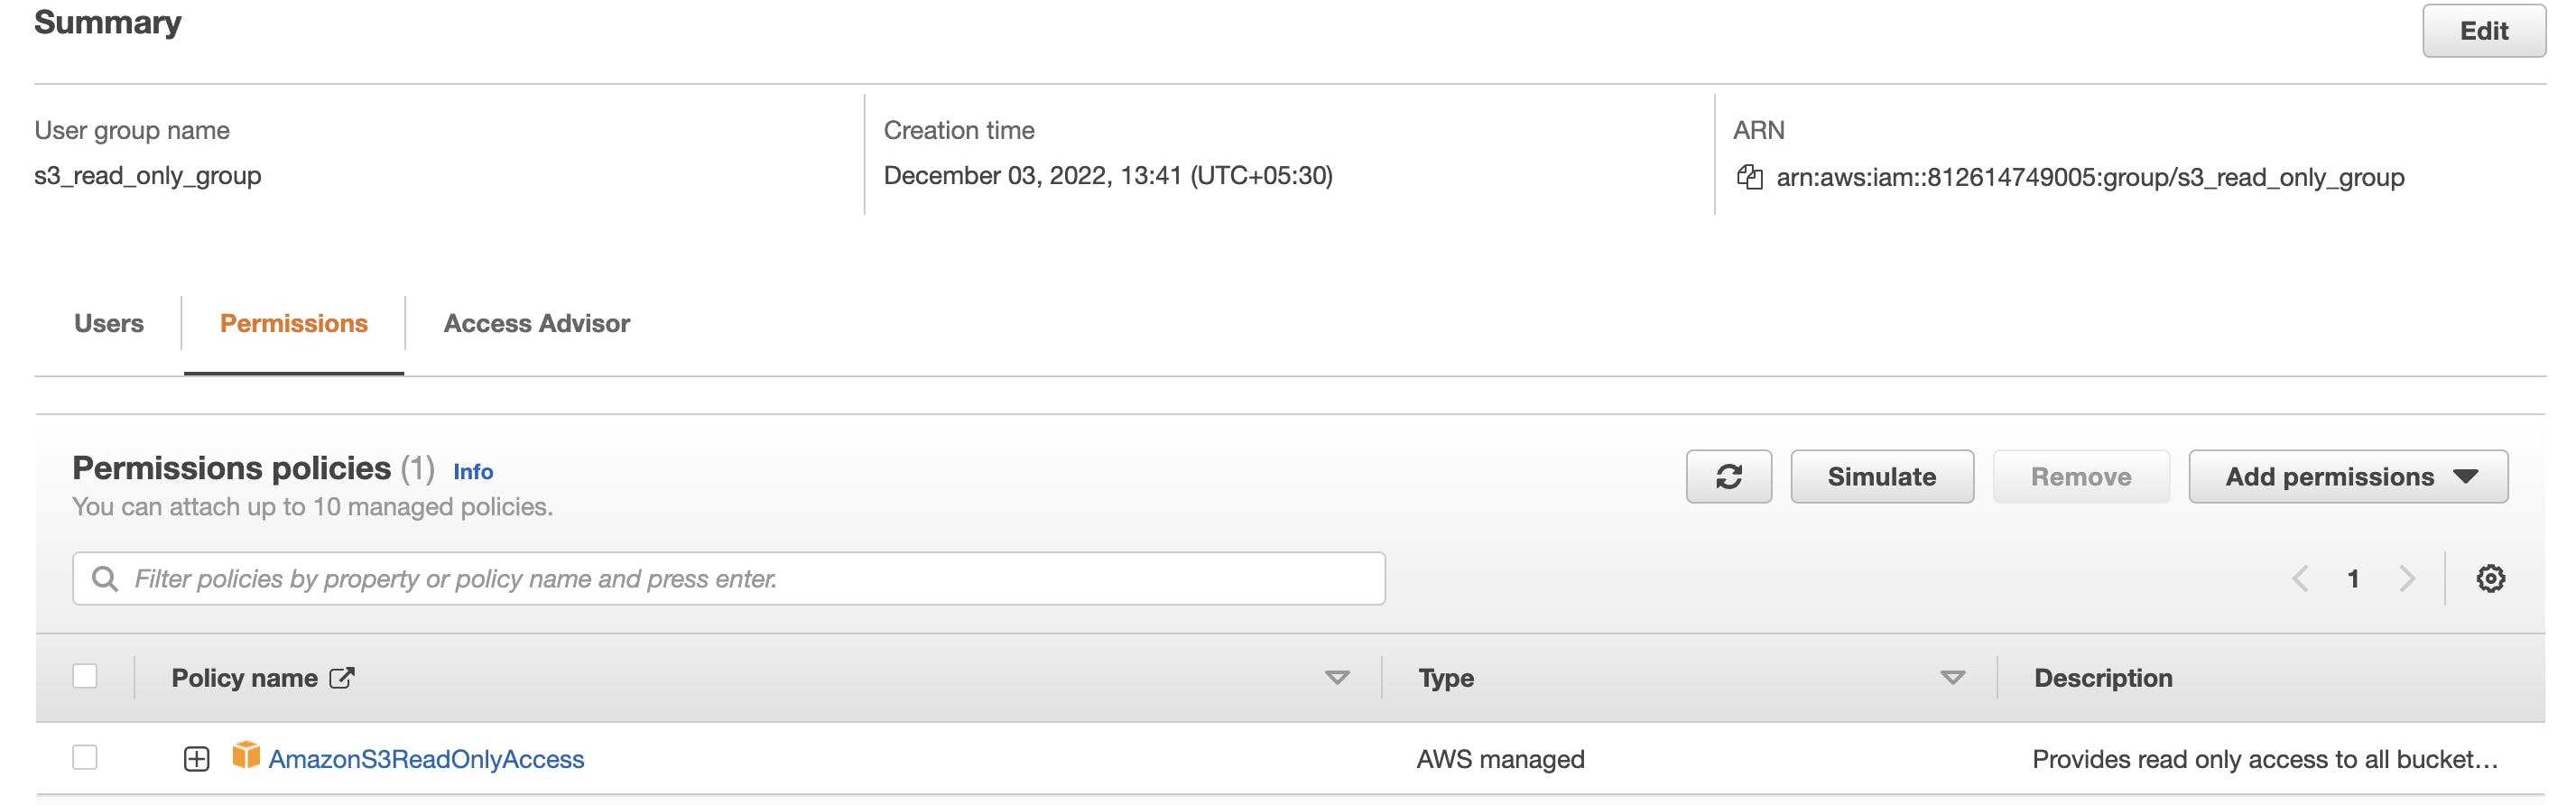
We can create a new group, for example, "S3_read_only". Select "User groups" from the left panel on IAM services
If you notice, there is an option to add existing users to this group as well as assign a policy at the group level. As mentioned earlier, once a policy is assigned at the group level, it is applicable to all the users in the group.
Next time, when we add a user, instead of attaching a policy, we can simply add them to a group and that policy will be applicable to all the users in the group.
Let's have quick look at the policy. Search for "IAM" service and select "User groups" from left navigation. Select the created group, for e.g., "s3_read_only_group" and go to the permissions tab. Click on the "+" on the policy as shown below
This will expand the policy as shown here
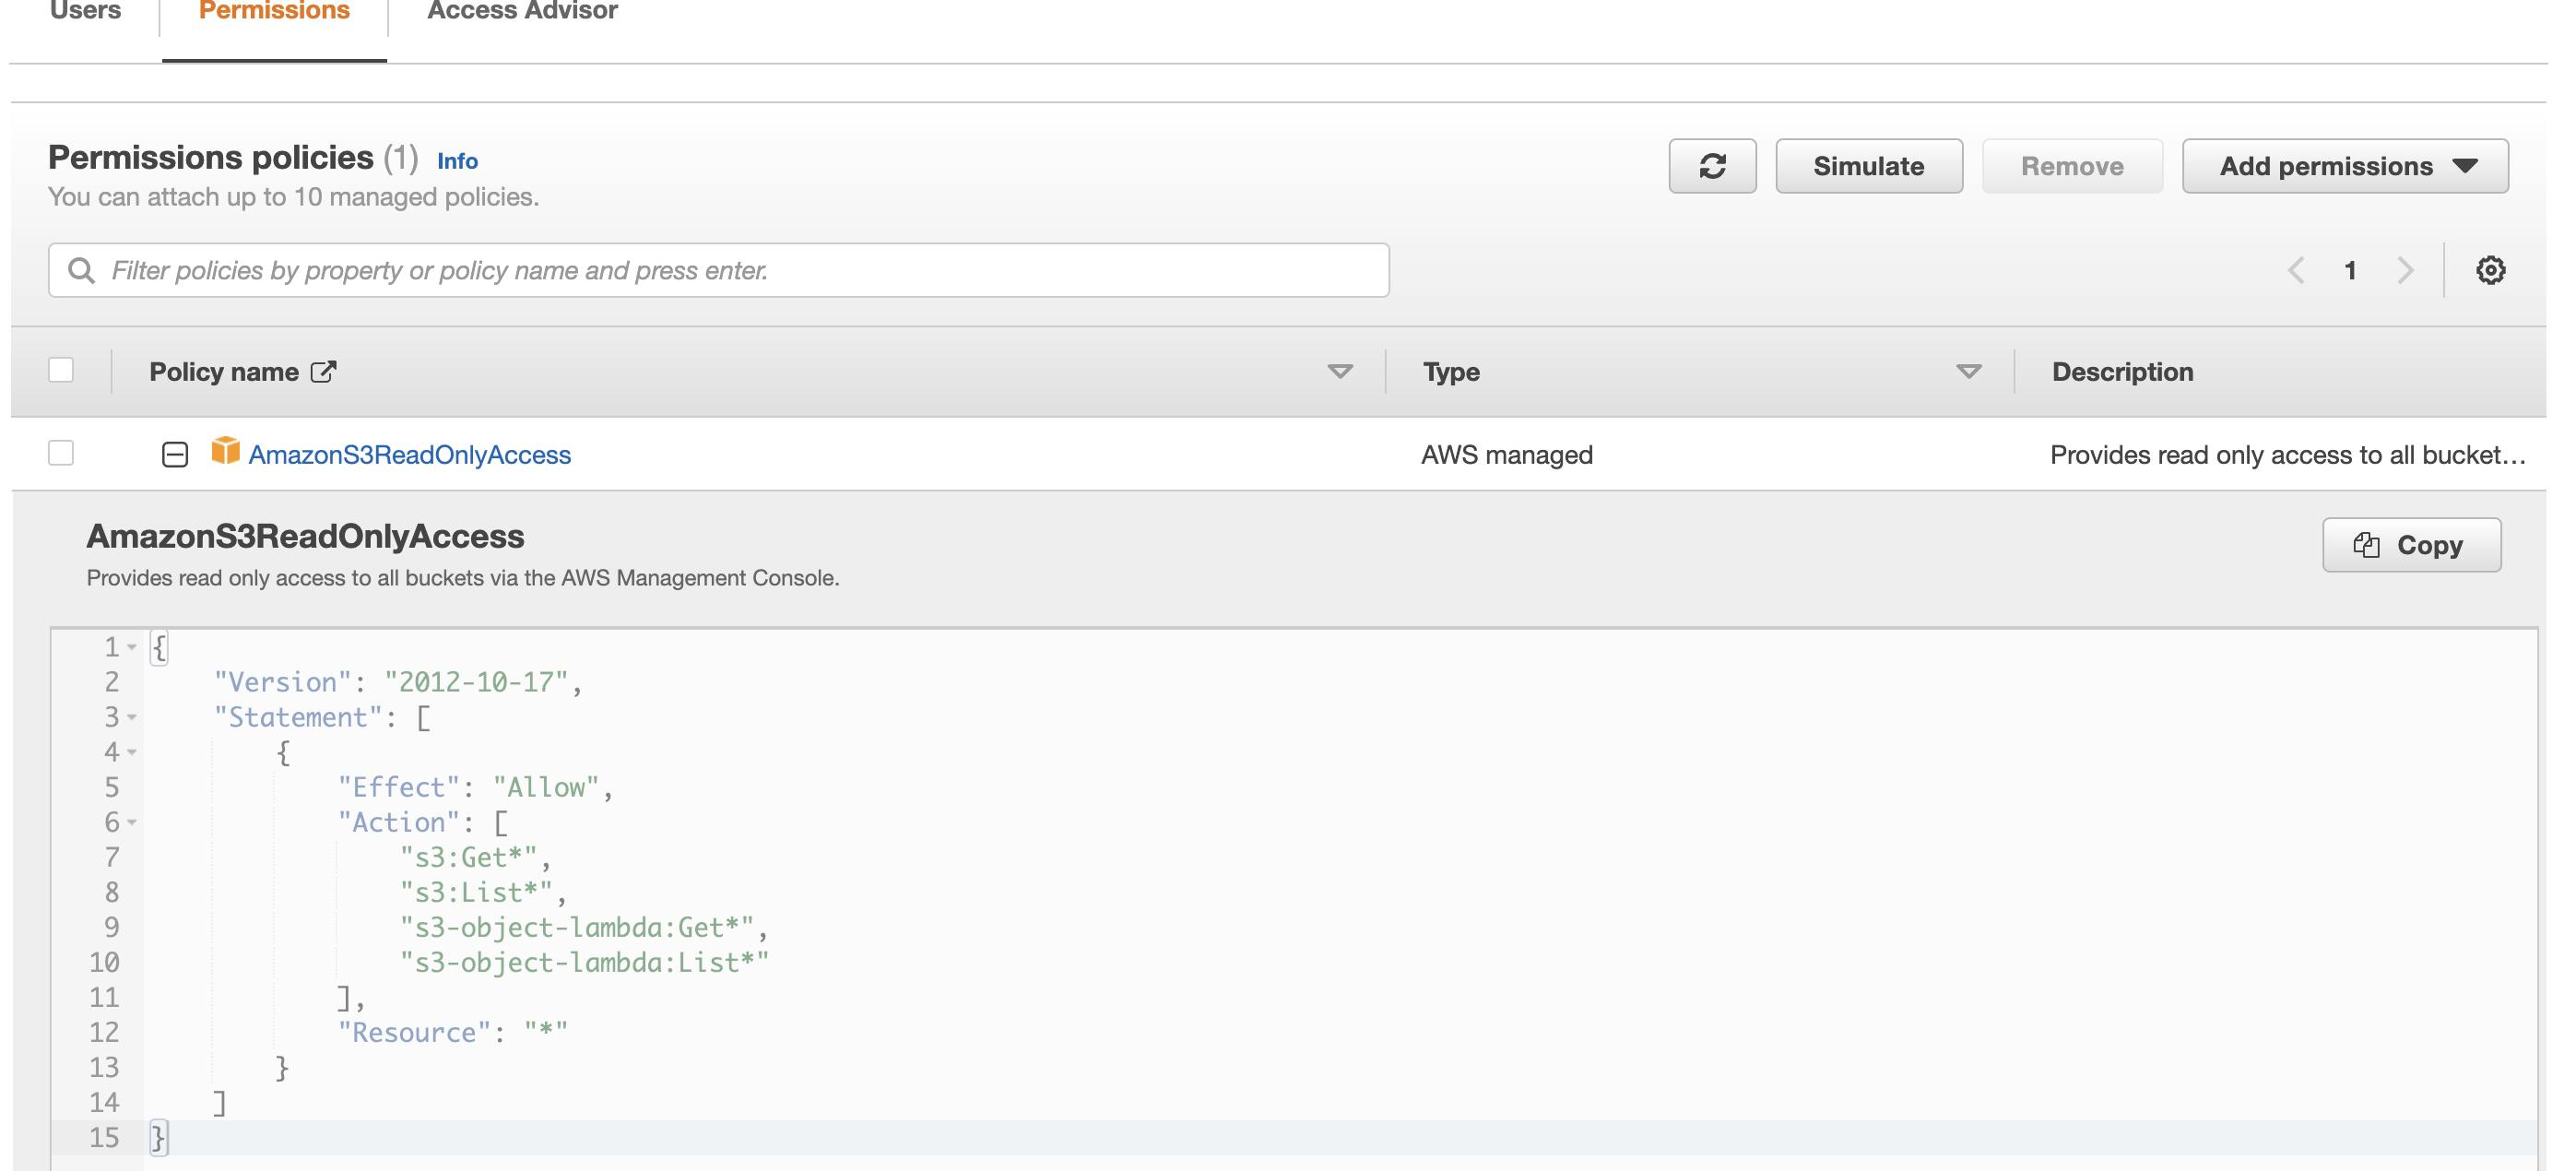
The policy is very easy to understand,
Line 5 indicates we are going to allow certain actions(line 7 to 10) on resources listed at line 12 to all the users who are part of this group
Line 7 to 10 identifies what actions are allowed -we can easily edit this and include or remove actions
Line 12 list the resources, '*" indicates all the buckets in S3, but we can easily restrict this to a particular bucket, or a bucket with certain name pattern
I will conclude the blog post with this summary
Resources -Services available on AWS which need to be secured
Policies -A set of rules governing what operations are allowed on each resource by a particular identity (User or Program)
Users -or rather more correct word is Principal -actual users or programs which will be accessing the resources as per rules defined in the policies
Groups -A set of users grouped together based on some role, for example, all developers, all testers, sales, marketing, etc.
Some highlights
IAM is universal → does not apply to Region. We will understand this more when we cover global infrastructure of AWS
When a new signs up for AWS, for e.g., we did during this tutorial, it is always root user. Do not forget to set up MFA on the root account. Multi factor authentication, single sign on, enterprise integrations -this will cover in next iteration of IAM
For new users, unless we attach explicit policy, NO permissions will be granted when they are created
We will need to learn at least one more service for example S3, then we can use these policies to access the resource and do some experimentation. I will be back soon with S3 and we will build our first application in the next session -so watch out.
Following is a video which explains the navigation in console in more details! Thanks and bye for now.